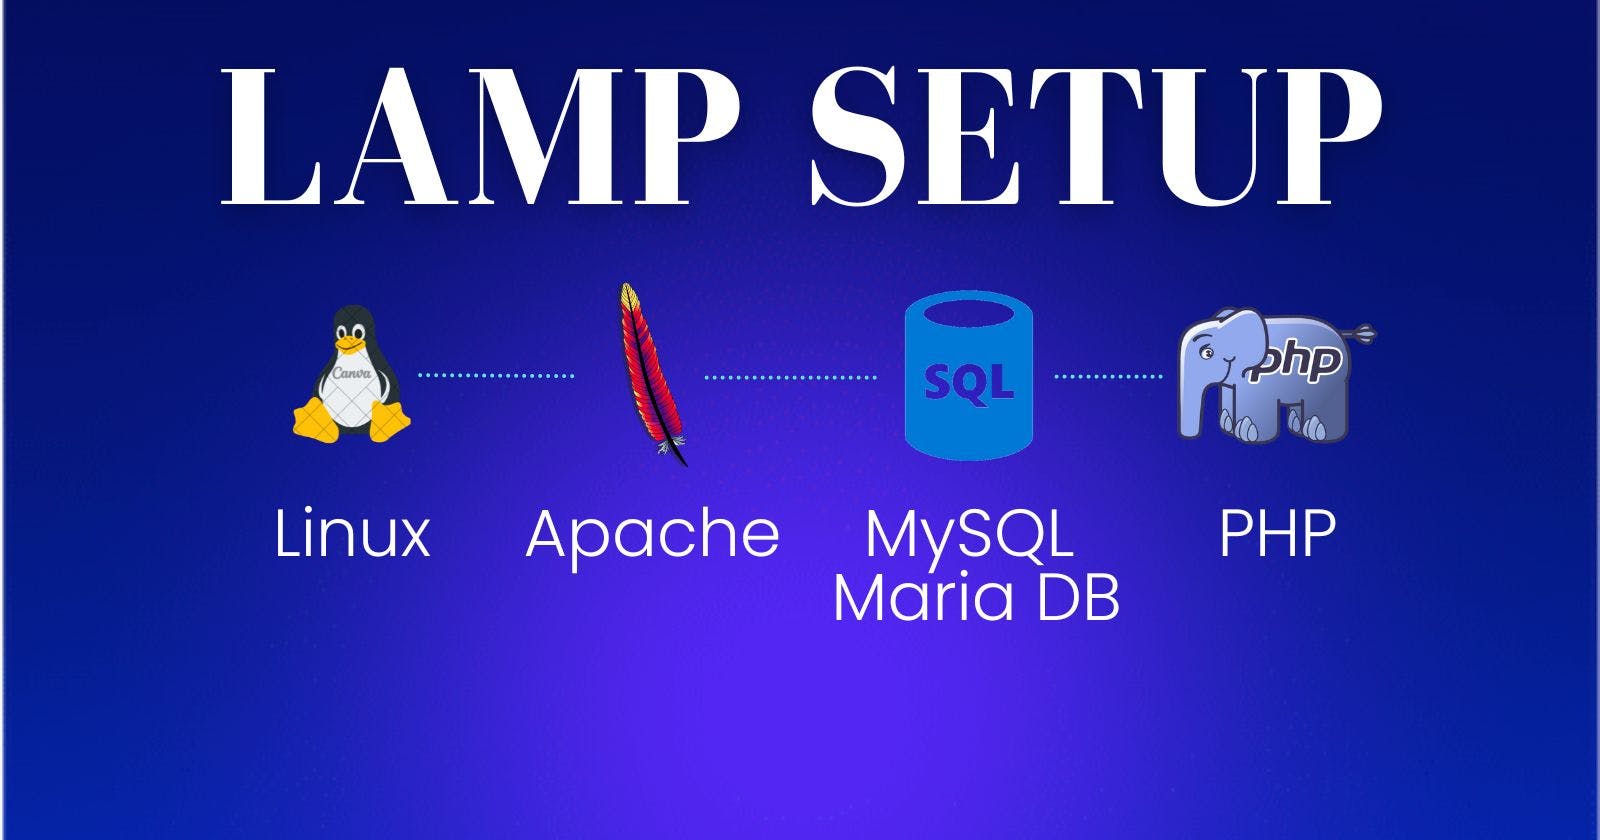
Step by Step Guide: How to Install LAMP
Setting Up Linux, Apache, MySQL, and PHP on Your Server.


A LAMP stack is a collection of four different software that programmers and web developers use to create and deploy the website.
In Lamp,
L - stands for Linux ( Operating System )
A - stands for Apache ( Web Server )
M - stands for the MySql or MariaDB ( Databases )
P - stands for the PHP, Pearl, Python ( Programming Language )
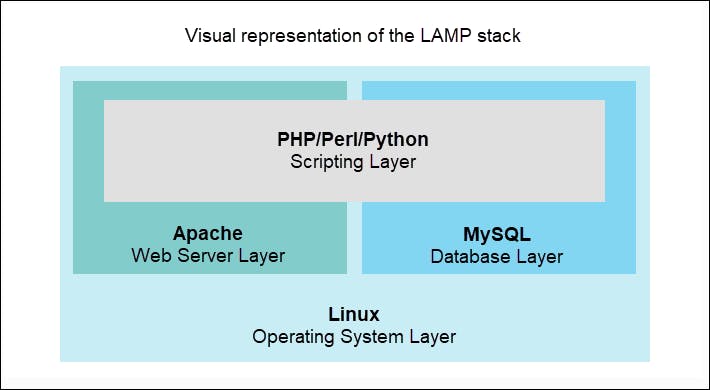
Linux is an Open source OS ( Operating System )that is widely used for servers. Apache is a Web Server that serves HTTP and HTTPS requests. MySQL and Maria DB are open source Relational Database Management System ( RDBMS ). PHP is an acronym for Hypertext Preprocessor. PHP is the most used server-side programming language on the web 79.2% of all websites rely on PHP to some degree( Source: Google ). Also on some servers, we use Pearl and Python as Programming language in lamp stack.
Step 1: Linux Setup
Now if you're using any of the cloud providers then there's a chance that you already spun up Virtual Machine, Ec2, Compute Engine or Droplet. (these all are compute resources in the Cloud and have different names as it's provided by different cloud providers)
Now if you're working in RHEL ( Red-Hat Enterprise Linux ) or Cent-os type Distribution then your package manager will be Yum. And if you're working with the Ubuntu or Debian base distribution you're package manager is apt.
YUM & APT:
These two are package managers that simplify the installation, upgrade, and configuration of software packages on Linux systems. While they serve the same purpose, there are some notable differences between them.
Check your Os-Release with the given command to know which package manager to use.
1.1 Check your OS details Using the Below Command
NOTE: For Cent-OS, Red Hat & Debian-based distribution commands will be the same.
#this will change home directory to root
cd /
#this will print the content of Os-release file
cat etc/os-release
I've run the command in both types of Linux distribution.
Output :
1 ) For the Debian & Ubuntu base Distro
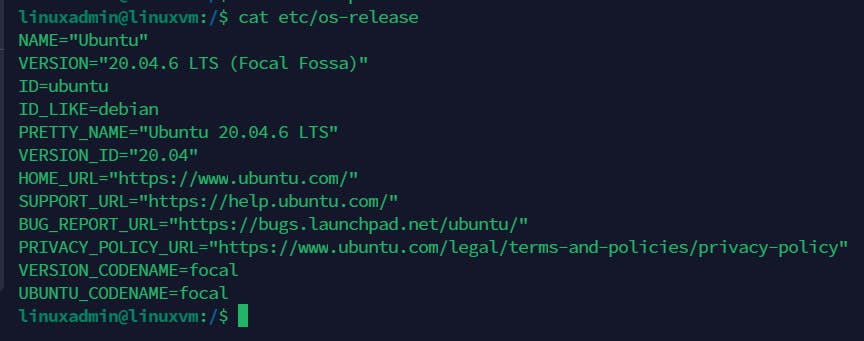
You Can see the Pretty Name and Version ID where you can confirm it's Ubuntu so here apt package manager will work.
2 ) For Red Hat and Cent-Os based Distro
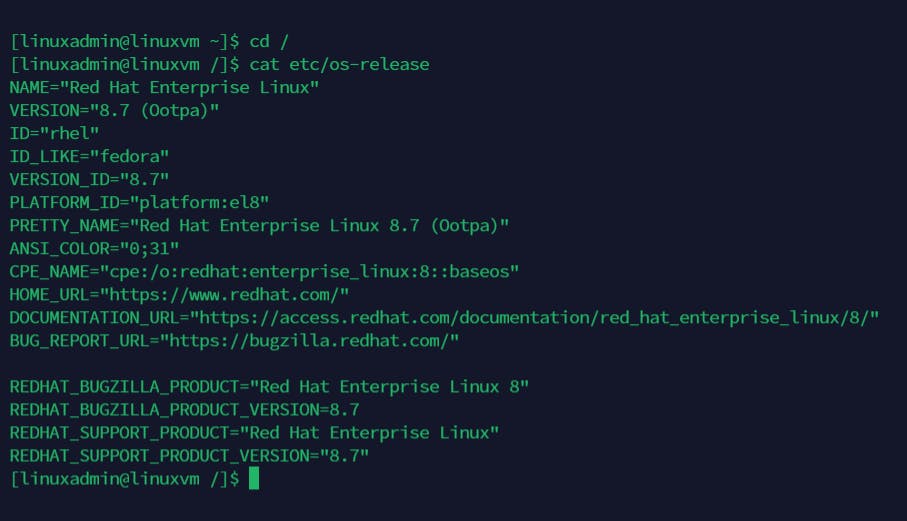
Here you can see the ID and Version ID which denotes the OS release version.
Now we can move to the Apache installation part.
Step 2: Apache 2 & Httpd Installation
Apache is the oldest and famous HTTP web server which support PHP and run on Unix and Windows-based system. It's an open-source project that provides a secure, efficient, extensible server that provides HTTP service in sync with the current HTTP standard.
Apache HTTP Server is a project of The Apache Software Foundation.
We start the installation by updating the package manager cache. If you're using sudo in this session for the first time. It will ask for a user password to confirm that your user has the right privileges to manage system packages.
Make sure you update your packages with apt and yum using the given command.
2.1 Install Apache2 in Ubuntu & Debian-Based Linux:
sudo apt update
This apt command will update the package cache to the latest
Now, Let's install Apache.
sudo apt install apache2
After entering this command, apt will tell you which packages it plans to install and how much extra disk space they’ll take up. Press Y and hit ENTER to confirm, and the installation will proceed.
2.1.1 Adjust the Firewall to Allow Web Traffic :
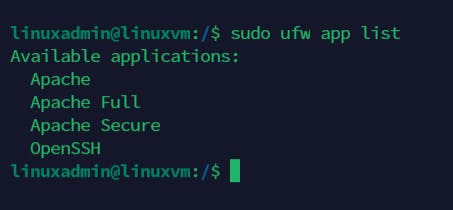
Next, assuming that you have followed the initial server setup instructions and enabled the UFW firewall, make sure that your firewall allows HTTP port 80 and HTTPS port 443 traffic. You can check that UFW has an application profile for Apache like so:
sudo ufw app list
Output:
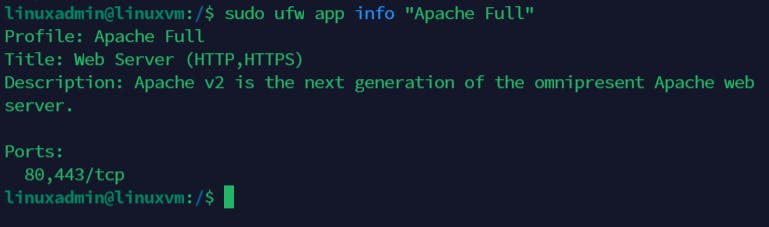
If you look at the Apache Full profile details, you’ll see that it enables traffic to ports 80 and 443:
sudo ufw app info "Apache Full"
Output:
For allowing HTTP and HTTPS traffic now allow the Apache full using the given command.
sudo ufw allow "Apache Full"
Output:

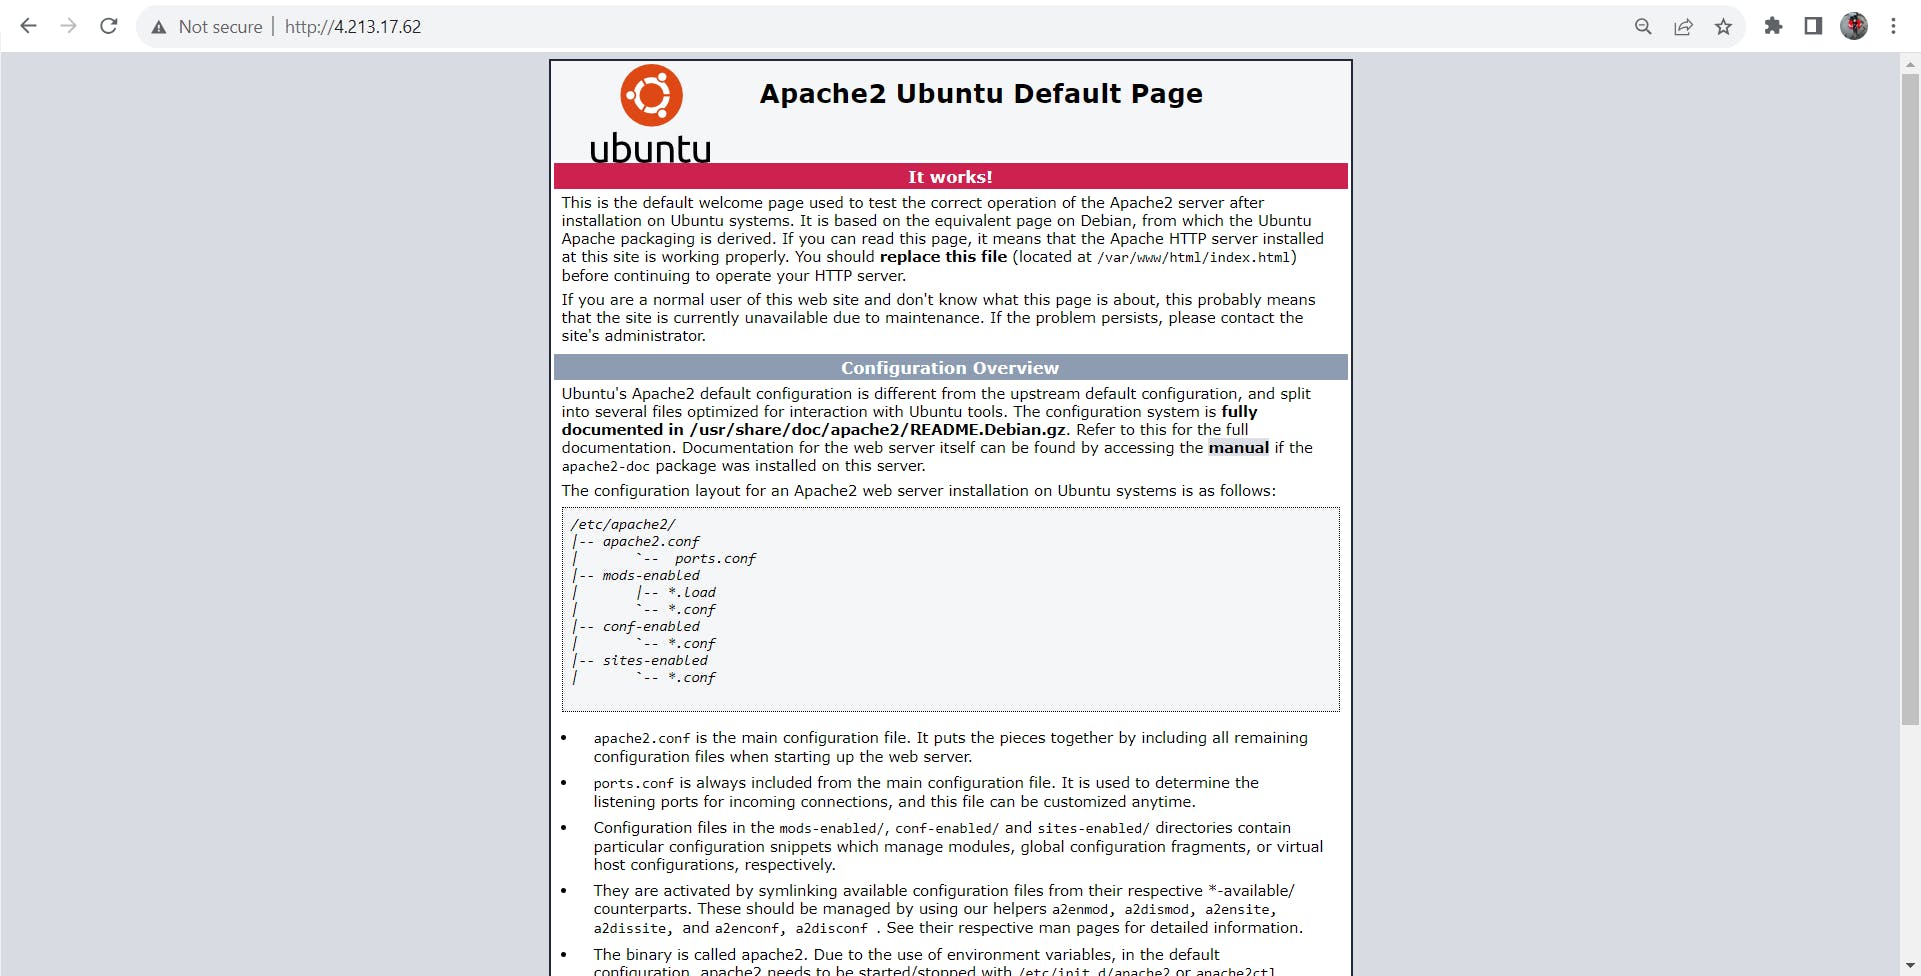
Now you can check Your server's public IP and make sure everything went as we wanted and now our server is showing the Server's Default Web page. by entering the given way in your browser.
http://your_server_ip
Output :
2.1.2 How to find the server's public IP?
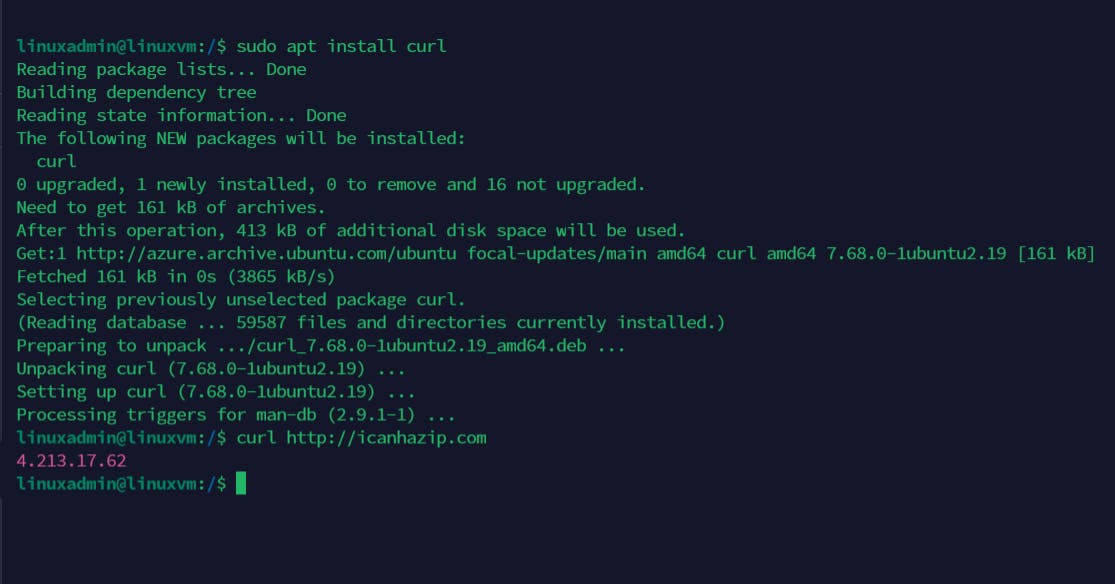
There are so many ways to find the Public IP of your server but the most prominent
method is to use the curl utility to contact an outside party to tell you how it sees your server. This is done by asking a specific server what your IP address is.
#this will install curl if it exists it will show package exist
sudo apt install curl
#this will curl the third party utility
curl http://icanhazip.com
Output :
Regardless of the method you use to get your IP address, type it into your web browser’s address bar to view the default Apache page.
More Commands to check your IP:
#1
ip addr show eth0 | grep inet | awk '{ print $2; }' | sed 's/\/.*$//'
#2
hostname -I
#3
ip a
#4
ip addr
#5
ifconfig
We have 5 commands one will work for you.
2.1.3 Setting Up a Virtual Host ( Highly Suggested )
When working with the Apache web server, it's advantageous to employ virtual hosts (similar to server blocks in Nginx). Virtual hosts allow you to compartmentalize configuration details and host multiple domains from a single server, we will create a virtual host for a domain called "iamrushabhshahh" Please replace "your_unique_domain" with your actual domain name.
By default, Apache comes with one server block that serves documents from the /var/www/html directory. While this setup works for a single site, it becomes cumbersome when hosting multiple sites. Instead of modifying the /var/www/html directory, we'll establish a directory structure within /var/www for the "iamrushabhshahh" site. The /var/www/html directory will remain in place as the default directory to serve content if a client request doesn't match any other sites.
Let's create the directory for iamrushabhshahh.
sudo mkdir /var/www/iamrushabhshahh
Next, set the ownership of the directory using the $USER environment variable, which refers to the currently logged-in user
sudo chown -R $USER:$USER /var/www/iamrushabhshahh
The permissions of your web root directory should be correct unless you've modified its mask value. To ensure the permissions are set correctly, you can use the following command
sudo chmod -R 755 /var/www/iamrushabhshahh
Now, let's create a sample index.html page using your preferred text editor. For example, you can use vim
sudo vim /var/www/iamrushabhshahh/index.html
<!DOCTYPE html>
<html lang="en">
<head>
    <title>Iamrushabhshahh</title>
</head>
<body>
    <h1>Hey mate, we set up a custom virtual host</h1>
</body>
</html>
After writing it Use esc then press : and wq to save and exit
To serve this content via Apache, we need to create a virtual host configuration file. Instead of modifying the default configuration file located at /etc/apache2/sites-available/000-default.conf directly, let's create a new one at /etc/apache2/sites-available/iamrushabhshahh.conf
sudo vim /etc/apache2/sites-available/iamrushabhshahh.conf
Paste the following configuration block into the file. This block is similar to the default configuration but updated for our new directory and domain name.
<VirtualHost *:80>
    ServerAdmin webmaster@localhost
    ServerName iamrushabhshahh
    ServerAlias www.iamrushabhshahh
    DocumentRoot /var/www/iamrushabhshahh
    ErrorLog ${APACHE_LOG_DIR}/error.log
    CustomLog ${APACHE_LOG_DIR}/access.log combined
</VirtualHost>
Save and close the file.
Now, enable the virtual host file using the a2ensite tool
sudo a2ensite iamrushabhshahh.conf
Disable the default site defined in 000-default.conf
sudo a2dissite 000-default.conf
Next, test for configuration errors
sudo apache2ctl configtest
Output :

To implement your changes, restart Apache
sudo systemctl restart apache2
Apache should now be serving your domain name. You can test this by navigating to http://your_domain, where you should see output but as we still using ip hitting ip will give you same output.

Changing Apache’s Directory Index (Optional)
In some cases, you’ll want to modify the way that Apache serves files when a directory is requested. Currently, if a user requests a directory from the server, Apache will first look for a file called index.html. We want to tell the web server to prefer PHP files over others, to make Apache look for an index.php file first. If you don’t do that, an index.html file placed in the document root of the application will always take precedence over an index.php file.
To make this change, open the dir.conf configuration file in a text editor of your choice. Here, we’ll use vim
#if you're not in root directory then switch to root
cd /
#open editor
sudo vim /etc/apache2/mods-enabled/dir.conf
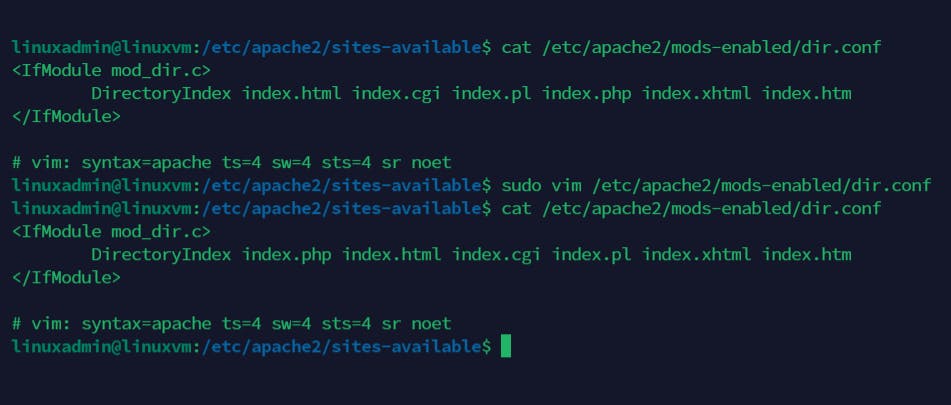
Move the PHP index ( index.php ) file on to the first position after the DirectoryIndex specification.
When you are finished, save and close the file by pressing esc then : and wq
After this, restart the Apache web server for your changes to be recognized. You can do that with the following command:
sudo systemctl restart apache2
You can also check on the status of the apache2 service using systemctl
sudo systemctl status apache2
2.2 Install HTTPD in RHEL & Cent-OS Based Linux
Enter the given command to Update the Package.
sudo yum update
Now after updating the system packages, we can go for the Installation of Apache 2. In RHEL ( RED HAT ENTERPRISE LINUX ) we don't have apache 2 naming in that we use HTTPD web server.
HTTPD is the same application as apache2, but some Linux distributions refer to it differently. RedHat-based distros (CentOS, Fedora) refer to it as httpd, while Debian-based distros (Ubuntu) refer to it as Apache.
2.2.1 Install HTTPD in RHEL & Cent-Os
sudo yum install httpd
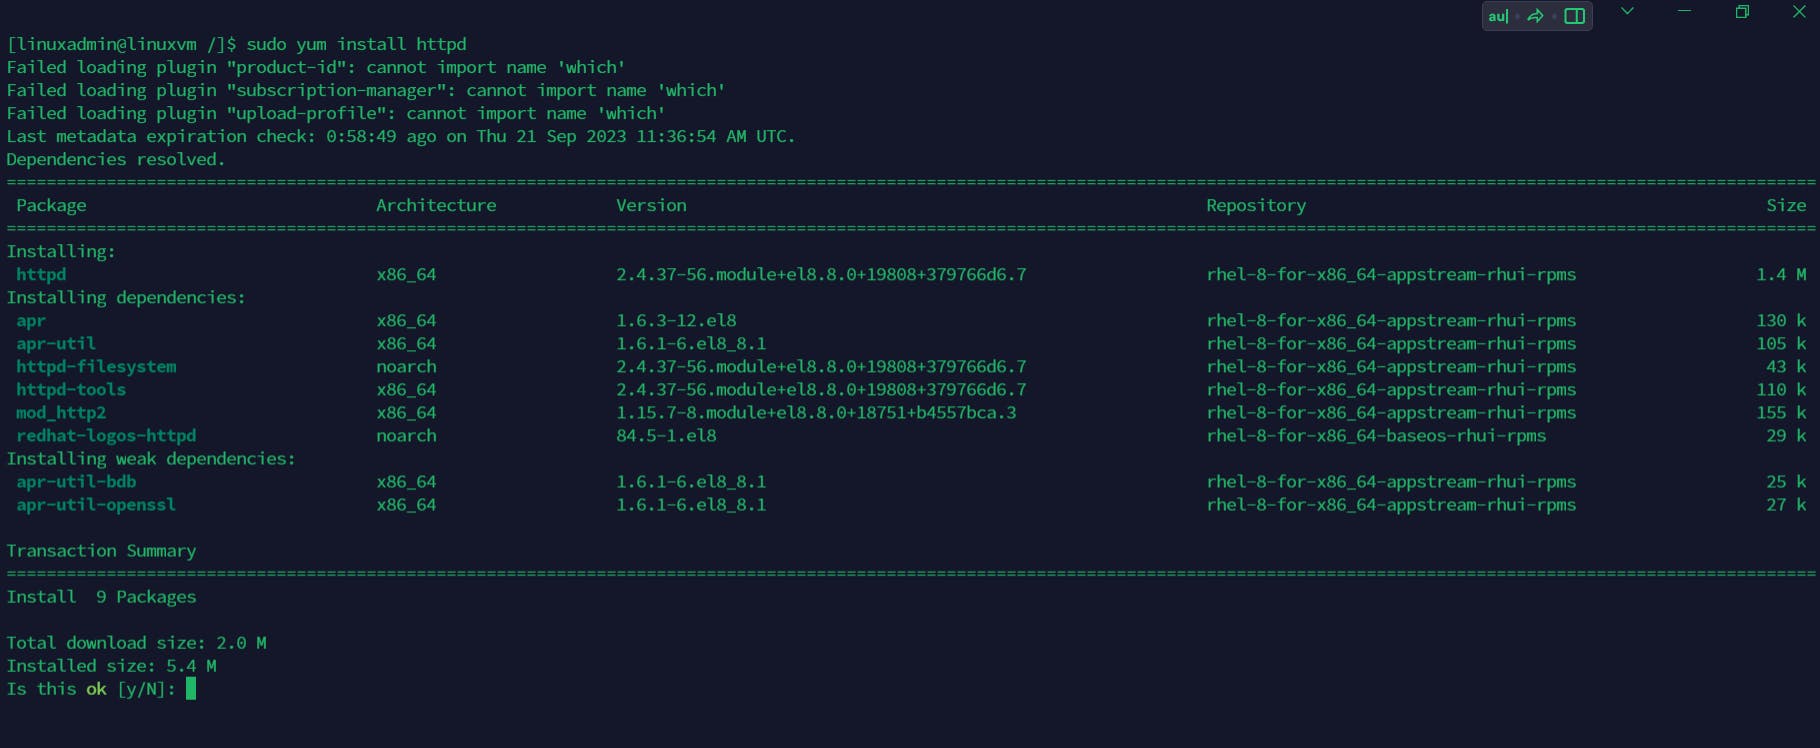
After entering this command, yum will tell you which packages it plans to install and how much extra disk space they’ll take up. Press Y and hit ENTER to confirm, and the installation will proceed.

After successful installation, it will show installed packages and a Completion message on the terminal.
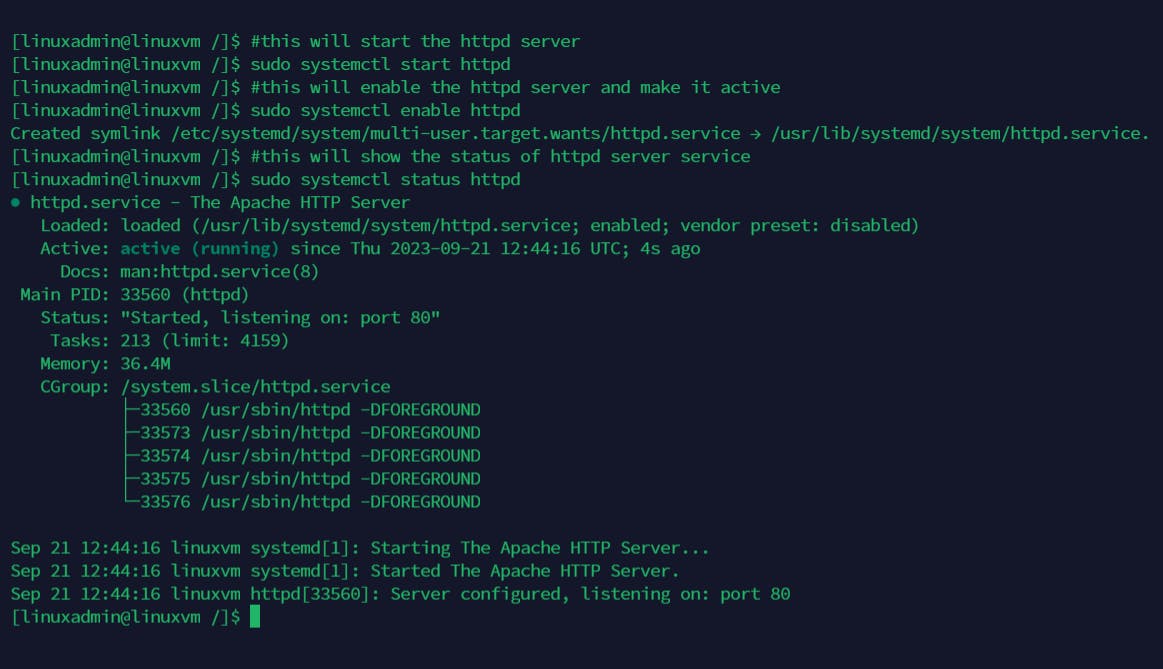
2.2.2 Start the httpd service in os :
After finishing the httpd installation, use the following commands to manage the Apache daemon since RHEL and CentOS both migrated their init scripts from SysV to Systemd.
#this will start the httpd server
sudo systemctl start httpd
#this will enable the httpd server and make it active
sudo systemctl enable httpd
#this will show the status of httpd server service
sudo systemctl status httpd
Output :
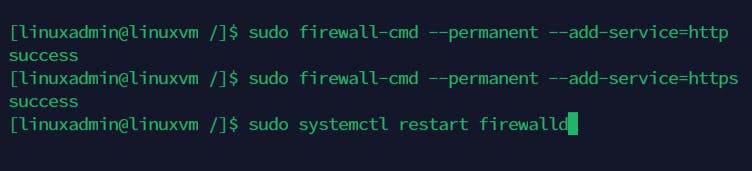
2.2.3 Adjust the Firewall to Allow Web Traffic:
In this step, make sure to allow access to HTTPD by opening ports 80 and 443 on the Firewall using firewall-cmd, which is the default command to manage Firewalld through daemon.
# Add HTTP service to the firewall rules (temporary)
sudo firewall-cmd --add-service=http
# Add HTTPS service to the firewall rules (temporary)
sudo firewall-cmd --add-service=https
# Restart the firewall to apply the temporary changes
sudo systemctl restart firewalld
NOTE: Make notice that using this rule will lose its effect after a system reboot or Firewalld service restart because it opens on-fly rules, which are not applied permanently.
To apply consistency iptables rules on the firewall using the --permanent option and restart the firewalld service to take effect.
# Add HTTP service to the firewall rules and make it permanent
sudo firewall-cmd --permanent --add-service=http
# Add HTTPS service to the firewall rules and make it permanent
sudo firewall-cmd --permanent --add-service=https
# Restart the firewall to apply the changes
sudo systemctl restart firewalld
OutPut:
Some important Firewalld commands to manage the firewall as presented below:
# Check the firewall state to see if it's running
sudo firewall-cmd --state
# List all firewall settings and configurations
sudo firewall-cmd --list-all
# List network interfaces managed by the firewall
sudo firewall-cmd --list-interfaces
# Get information about a predefined service in the firewall
sudo firewall-cmd --get-service
# Check if a specific service has firewall rules defined
sudo firewall-cmd --query-service service_name
# Add a firewall rule to allow incoming traffic on port 80 (HTTP)
sudo firewall-cmd --add-port=80/tcp
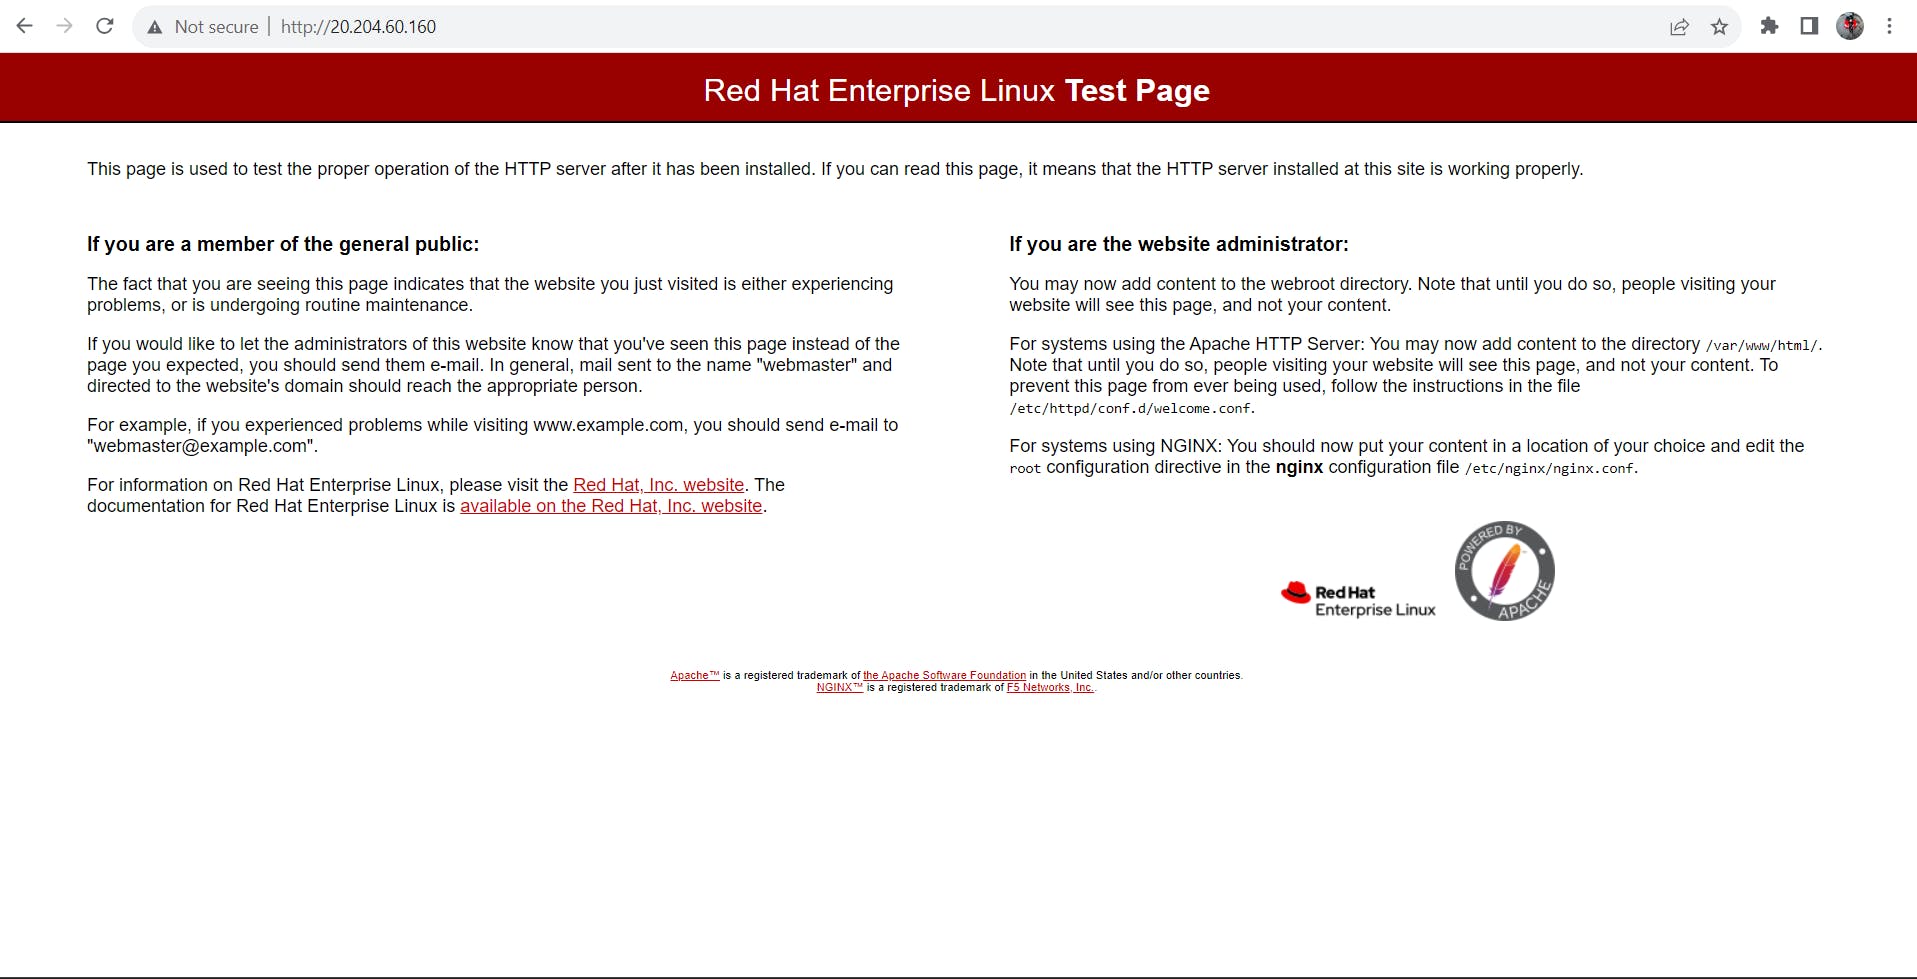
Now we reach a moment where we can go and check server is running or not. To verify HTTPD functionality open a remote browser and type your server IP Address using the HTTP protocol on the URL.
http://server_IP
Now a default page should appear like in the screenshot below.
OutPut:
2.2.4 How to find the server's public IP
There are so many ways to find the Public IP of your server but the most prominent
An alternative method is to use the curl utility to contact an outside party to tell you how it sees your server. This is done by asking a specific server what your IP address is:
sudo apt install curl
curl http://icanhazip.com
Apart from that you can use the given command too :
# View detailed network interface information, including IP addresses.
ip address show
# To check the IP address of a specific interface (e.g., 'eth0'):
ip address show dev eth0
# Another option to check network interface information, including IP addresses.
ifconfig
# To check the IP address of a specific interface (e.g., 'eth0'):
ifconfig eth0
# Quickly retrieve the primary IP address.
hostname -I
# Using 'curl' to Get External IP (Public IP) Query an external service to determine your public IP address.
curl ifconfig.me
Step 3: MySQL / Maria DB installation
Now that you have a web server up and running, you need to install the database system to be able to store and manage data for your site. MySQL & MariaDB is a popular database management system that supports PHP environment.
MariaDB is made using the fork of MySQL so they both are similar but for different environments. The working principle is the same for both RDBMS.
3.1 MySQL installation in Ubuntu & Debian Based Linux :
Again, use apt to acquire and install this software:
sudo apt install mysql-server
When asked press y and press enter and continue with the process.
Note: In this case, you do not have to run sudo apt update before the command. This is because you recently ran it in the commands above to install Apache. The package index on your computer should already be up-to-date.
After the installation is done enter the given command
sudo mysql_secure_installation
MySQL comes with some default settings that can be dangerous so make sure you make your database secure using the above command which will start an automated interactive script that comes in MySQL installation by default.
This will ask if you want to configure the VALIDATE PASSWORD PLUGIN.
NOTE: Enabling this feature in MySQL means setting password criteria, and if a password doesn't meet those criteria, MySQL will reject it with an error. However, if you're using software like phpMyAdmin with automatic MySQL user credential setup, weak passwords can cause problems. It's generally okay to keep validation disabled, but it's crucial to always use strong, unique passwords for your database credentials.
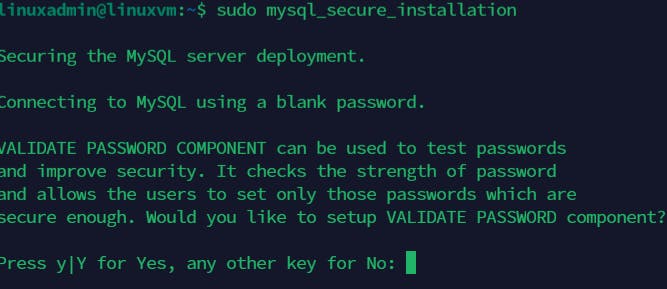
Answer Y for yes, or anything else to continue without enabling.

If you want a Low Security Password press 0 and press enter
for the Medium Security Password press 1 and press enter
for Strong Security Password press 2 and press enter
Here I opted for 0 and went for low security password as I'm just doing demo installation.
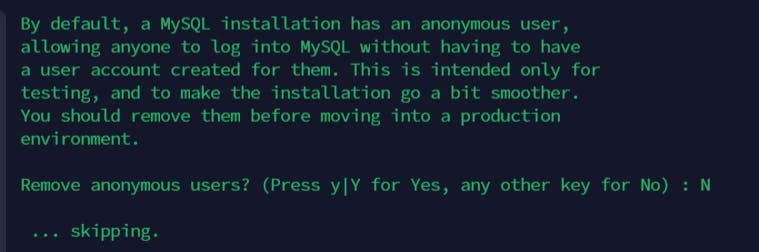
Then it will ask to remove the anonymous user I opted No, This account is for Testing purposes so it's okay to not remove that user for better security remove that user.
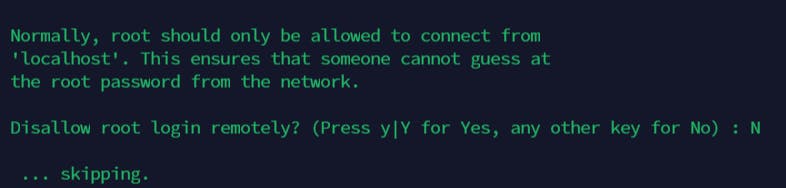
Then it will ask to disallow root login remotely choose no as we'll use remote access of root.

Then it will ask to remove one of the demo tables named test opt for yes then it will remove the table and say to reload the privilege table. opt for the Yes

Here we are done with the installation of MySQL successfully, Now verify it whether the installation was successful or not.
sudo mysql
This will connect to the MySQL server as the administrative database user root, which is inferred by the use of sudo when running this command. You should see output like this:
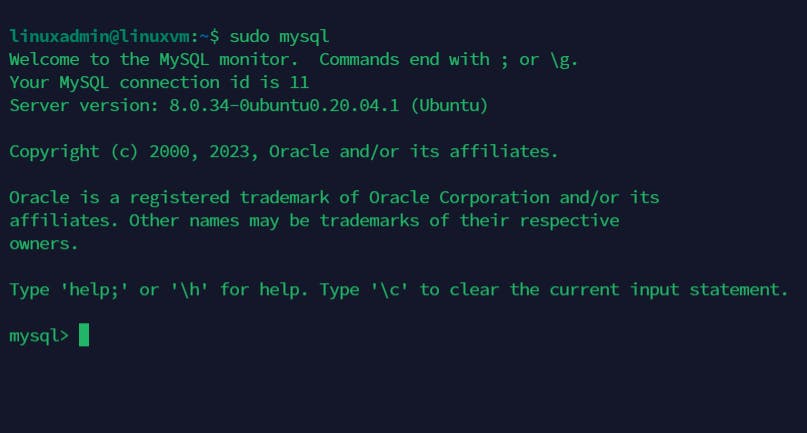
To exit the MySQL console, type:
mysql> exit
You might have noticed that even though you set a password for the root user when configuring MySQL, you didn't need to enter it when logging in as the root user. This happens because MySQL uses a special way to check the root user's identity, which doesn't involve a password. Instead, it checks if you're a system user with special privileges, like an admin. This might seem unusual, but it adds an extra layer of security because only certain users, like those with admin powers, can access the root account.
In practical terms, it means you can't use the root account to connect to MySQL from your PHP application. However, it's still a good idea to set a password for the root account just in case this special way of checking gets changed.
For better security, it's recommended to create separate user accounts with fewer privileges for each database you plan to use, especially if you're hosting multiple databases on your server. You can follow our guide on "How To Create a New User and Grant Permissions on MySQL" for step-by-step instructions on creating these user accounts and setting up their access rights.
So far, your MySQL server is installed and secure. Next, we'll install PHP, which is the last part of the LAMP stack.
3.2 MariaDB installation in RHEL & Cent-Os Based Linux:
The RHEL distribution switched from MySQL to MariaDB for its default database management system. To install the MariaDB database use the following command.
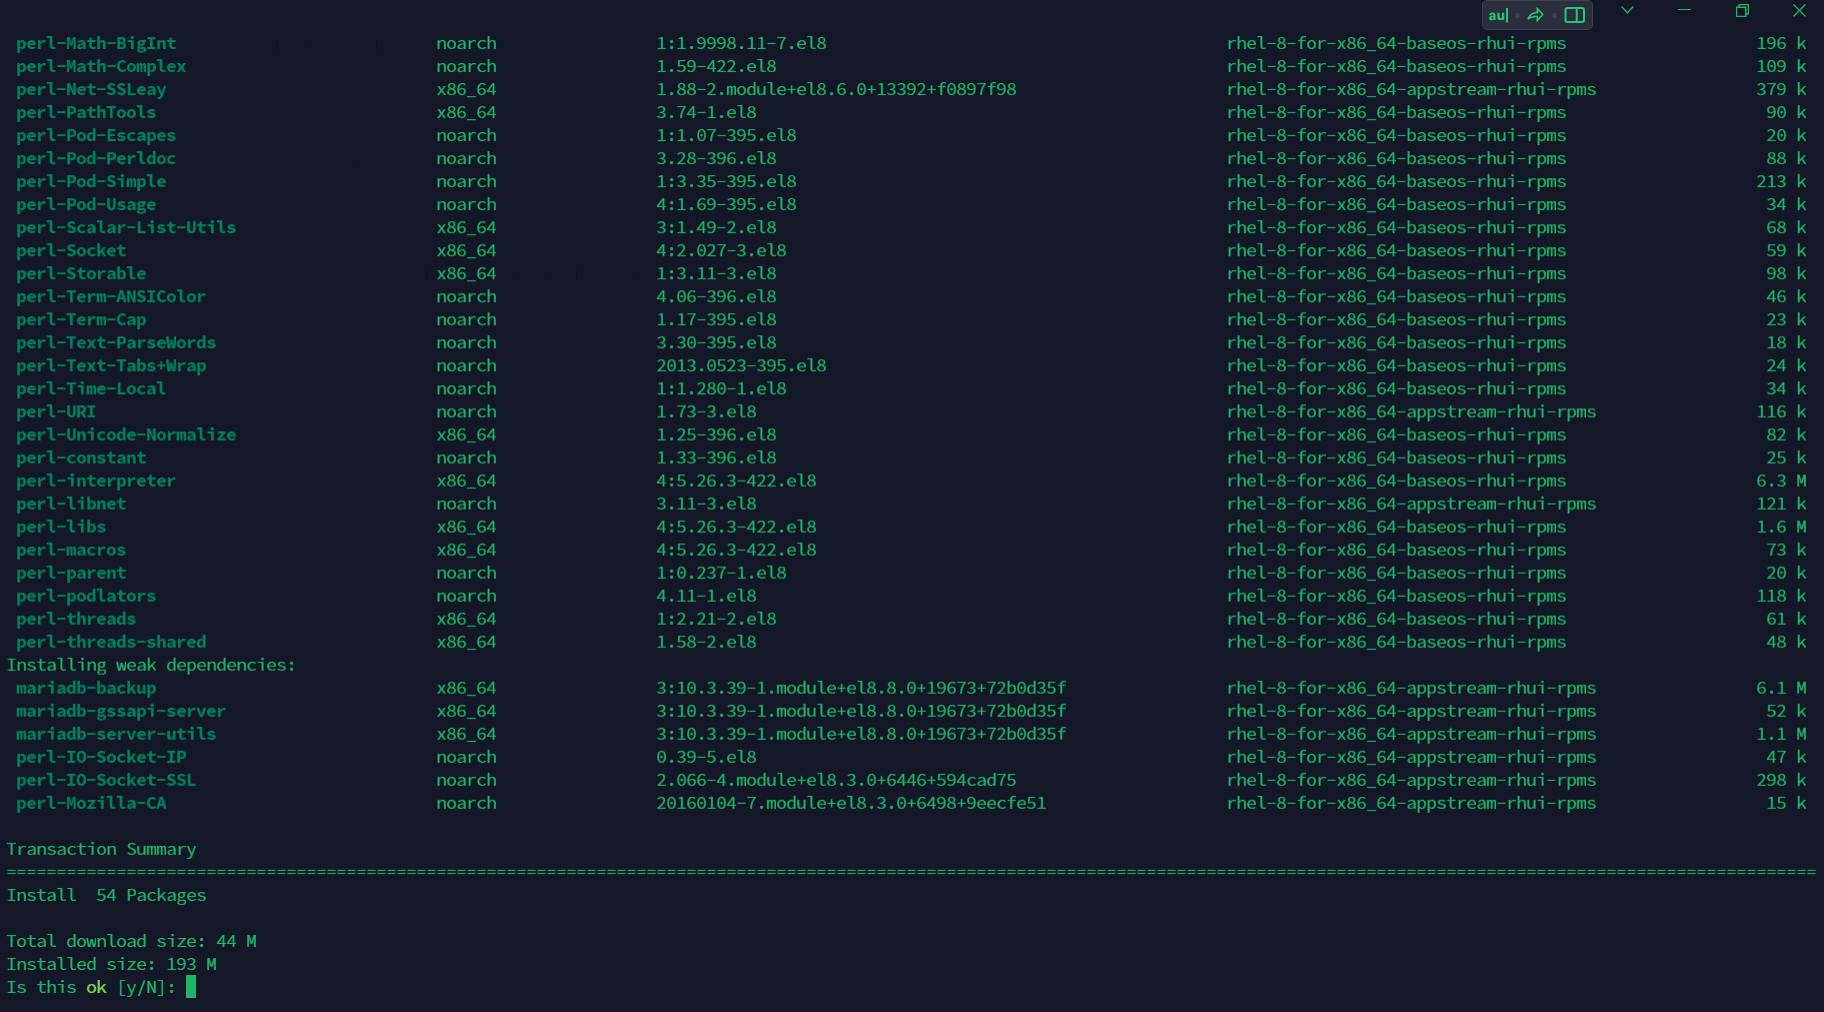
sudo yum install mariadb-server mariadb
After entering this command, yum will again tell you which packages it plans to install and how much extra disk space it’ll take up. Press Y and hit ENTER to confirm, and the installation will proceed.
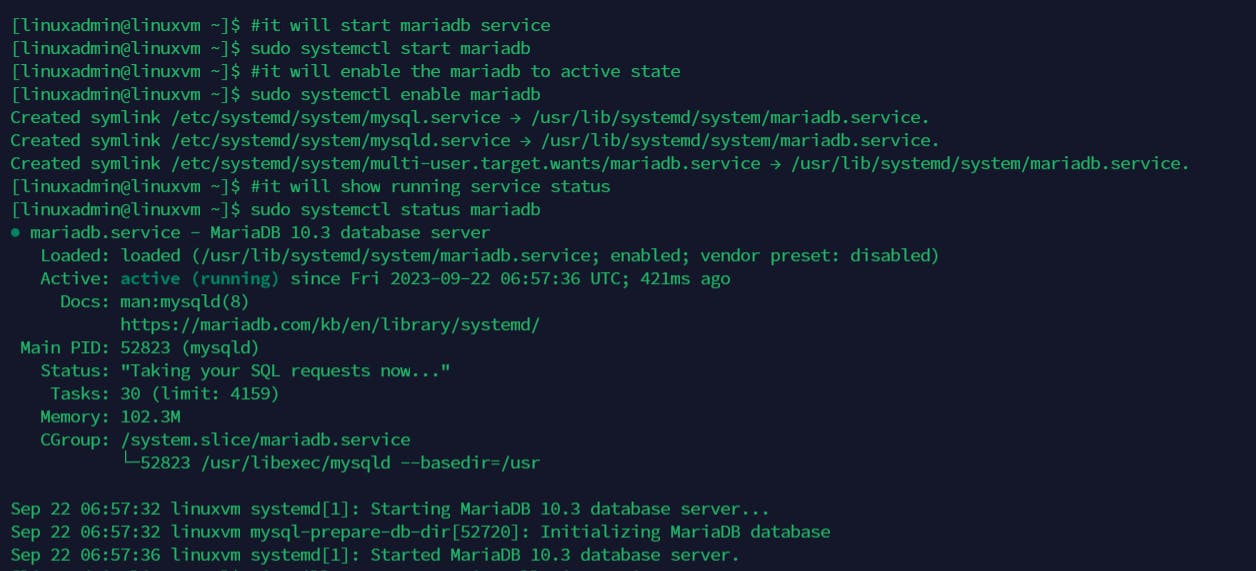
3.2.1 Start the MariaDB services:
After the MariaDB package is installed, start the database daemon and use the mysql_secure_installation script to secure the database (set a root password, disable remote login from the root, remove the test database, and remove anonymous users).
#it will start mariadb service
sudo systemctl start mariadb
#it will enable the mariadb to active state
sudo systemctl enable mariadb
#it will show running service status
sudo systemctl status mariadb
#it will start secure installation script
sudo mysql_secure_installation
Output:
After this run sudo mysql_secure_installation and select appropriately the options you want for better practice and making the database secure set a root password, disable remote login from the root, remove the test database, and remove anonymous users.
Here we are done with the installation of MariaDB successfully, Now verify whether the installation was successful or not.
mysql -u root -p
now if you assign a password to root enter it when prompted for a password.
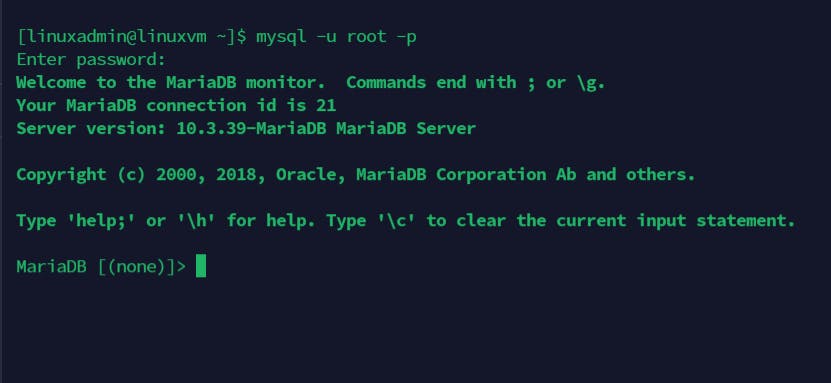
Here we can make sure that we've done with installation.
Now exit the MariaDB using the following command.
MariaDB > quit
Step 4: Installing PHP
PHP is a key component of setup it will show the dynamic web page content.
It will run scripts to connect users to the Mysql Database for retrieving information and hand the processed content over to your web server so that it can display the results to your visitors.
To install PHP along with the necessary components to make it work with Apache and httpd and connect to MySQL or MariaDB databases, you can use the following command. This command will also take care of installing any additional software that PHP requires:
4.1 PHP installation in Ubuntu & Debian Based Linux :
sudo apt install php libapache2-mod-php php-mysql
This single command installs PHP, the module to integrate it with Apache, and the package to enable PHP to communicate with MySQL databases.
it will ask for permission to press y and press enter
After installation is done, checking the PHP version uses the given command
php -v
Output:
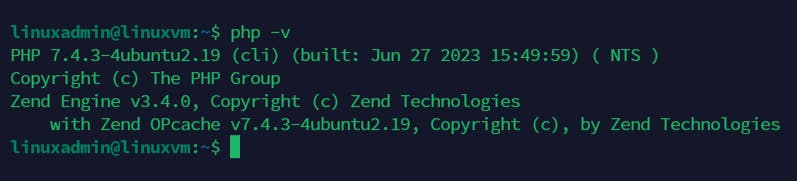
Here, you're done with the LAMP installation in Ubuntu and Debian Distribution.
Go For the Next steps for further modification in installation as those are optional you can stop here.
4.1.1 Check Php Process Working Or Not On your Web Server
In order to test that your system is properly configured for PHP, create a PHP script called info.php In order for Apache to find this file and serve it correctly, it must be saved to your web root directory.
Create the file at the web root you created in the previous step by running
sudo vim /var/www/iamrushabhshahh/info.php
Place below given code in that php file.
<?php
phpinfo();
?>
Output:
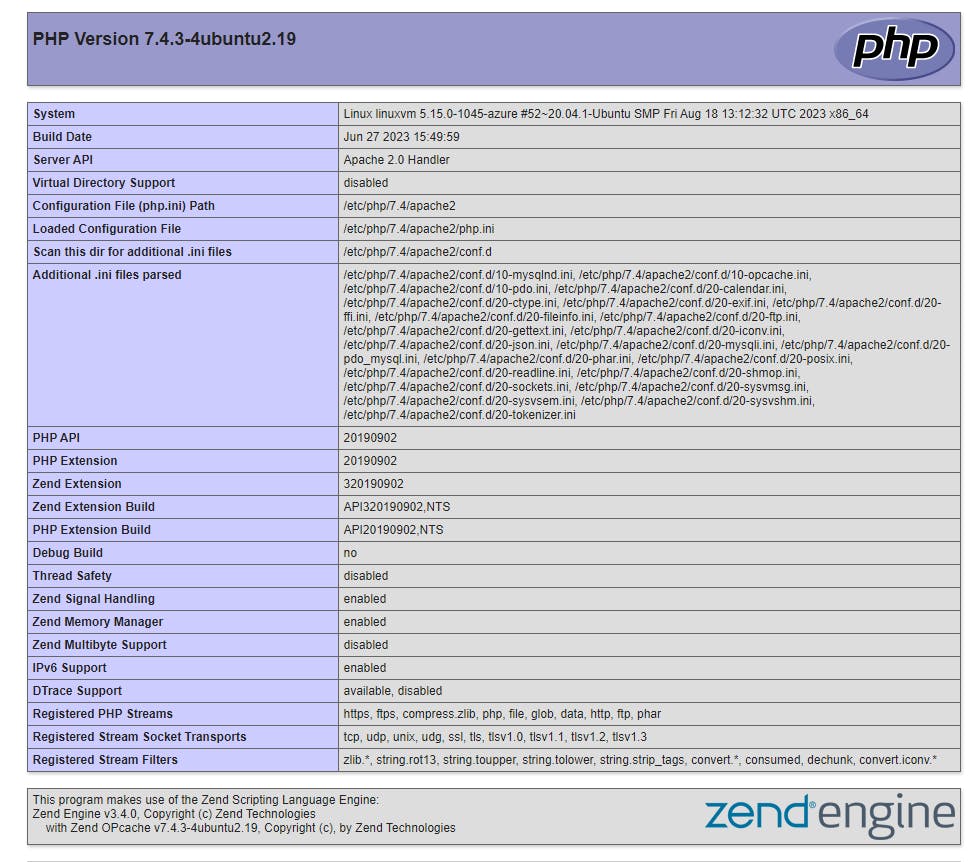
This page provides some basic information about your server from the perspective of PHP. It is useful for debugging and ensuring that your settings are being applied correctly.
If you can see this page in your browser, then your PHP is working as expected
You probably want to remove this file after this test because it could actually give information about your server to unauthorized users. To do this, run the following command.
sudo rm /var/www/iamrushabhshahh/info.php
Here you're done with the Whole LAMP setup on Ubuntu and Debian-based Linux System.
4.2 PHP installation in RHEL & Cent-Os Based Linux:
First of all, you need to configure EPEL and REMI repositories on your system. Remi repository contains the latest PHP packages for CentOS and RHEL systems.
Use the below command to configure the EPEL repository on your system.
sudo yum -y install https://dl.fedoraproject.org/pub/epel/epel-release-latest-8.noarch.rpm
After that, configure the REMI repository by running the below command.
sudo yum -y install https://rpms.remirepo.net/enterprise/remi-release-8.rpm
The Remi repository contains PHP 8.2, 8.1, 8.0, and 7.4 packages. You can enable the desired repository and install PHP packages with the below steps.
Once the repository installation is finished, list all the available PHP module streams with the following command.
sudo yum module list php
In this, you'll get the all available PHP versions.
Output:

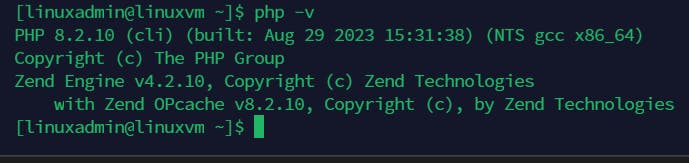
For example, I need to install PHP 8.2, then choose php:remi-8.2. You can select another version as per your requirements:
sudo yum module enable php:remi-8.2
Finally, run the following command to install PHP on your system.
sudo yum install php php-cli php-common
You can verify the installed PHP version using the below-given command
php -v
Output:
Now we are done with the Lamp Installation.
Enjoy your Lamp Machine to launch the Projects and WebSites for your client, customer and audience.
Enable LAMP System-Wide in Linux
If you need MariaDB and Apache services to be automatically started after reboot issue the following commands to enable them system-wide.
sudo systemctl enable mariadb
sudo systemctl enable httpd
That’s all it takes for a basic LAMP installation on RHEL-based distributions.
Conclusion :
In conclusion, a LAMP stack is a powerful combination of Linux (Operating System), Apache (Web Server), MySQL or MariaDB (Database), and PHP (Programming Language) used by web developers to create and deploy websites. This stack provides a robust foundation for building dynamic and database-driven web applications. The installation process involves configuring each component, ensuring proper compatibility, and securing the setup. Once installed and configured, a LAMP stack offers a reliable environment for hosting websites and web applications.
BONUS: For the Readers Who Made it to the Finish Line
LAMP Stack Alternatives, It's also widely used for the different tech stack we'll look into it in future Articles.
Open-source alternatives are:
MEAN (MongoDB, Express, Angular, Node.js)
LEMP (Linux, NGINX, MySQL/MariaDB, PHP/Perl/Python)
LAPP (Linux, Apache, PostgreSQL, PHP)
LEAP (Linux, Eucalyptus, AppScale, Python)
LLMP (Linux, Lighttpd, MySQL/MariaDB, PHP/Perl/Python)
XAMPP (Cross-platform, Apache, MariaDB, PHP, Perl)
Non-open source alternatives include:
WAMP (Windows, Apache, MySQL/MariaDB, PHP/Perl/Python)
WIMP (Windows, Internet Information Services, MySQL/MariaDB, PHP/Perl/Python)
MAMP (macOS, Apache, MySQL/MariaDB, PHP/Perl/Python)