Setup a Static Website Using Nginx
This project aims to help you learn to set up a static website using Nginx and configure DNS to make the website publicly accessible.


Table of contents
- Key Concepts Covered :
- Step 1 : Buy a domain name from a domain Registrar
- Step 2 : Spin up a Ubuntu server.
- Step 3 : SSH into the server and install Nginx
- Step 4 : Download freely available HTML website files.
- Step 5 : Move the website files to the Nginx website directory and making Config for Your Website.
- Step 6 : In your DNS account, create an A record and add the IP
- Step 7 : Use the dig command to verify the DNS records.
- Step 8 : Create a Let's Encrypt certificate for the DNS and configure it on the Nginx server.
- Step 9 : Let's Encrypt certificate for the DNS and configure it on the Nginx server.
As an DevOps engineer we host website in server where we have to make sure it's always up and running. So let's understand today how Static Websites got hosted in server. Also the best practices for hosting static website.
Key Concepts Covered :
DNS - Domain Name System
Linux
Webserver - Nginx
Dig command
SSL (Let's Encrypt)
OpenSSL command
Step 1 : Buy a domain name from a domain Registrar
I already have the domain so not gonna buy one. But you guys can buy it from the Domain providers like Namecheap, Go Daddy etc...
My Domain Provider is different, I got the domain Free so gonna use this for demo.
Step 2 : Spin up a Ubuntu server.
Here I'm using Digital Ocean droplet as Ubuntu server. You can find the server config over here.

Step 3 : SSH into the server and install Nginx
Now for SSH you can either use the command line or can go with the tools like putty, termius, MobaXterm etc..
I'm using Termius for my day to day task but for learning purpose I will suggest to go with the command line.
# Here hostname is ip.
# If you're using password then you can go directly like this And it will ask for password in input
ssh username@hostname

# If you're using key as authentication then you can go like this
ssh -i path_to_private_key username@hostname
I'm going with first command. Once you do SSH it will ask for password.

Now I'm logged in, let me install first Nginx.
Always update and upgrade server repo when you very first time login it after spinning it up.
sudo apt install nginx - y
Once it's installed start by below command.
#This Will start the service
sudo systemctl start nginx

#This will enable it for run service on restart or in failure
sudo systemctl enable nginx

#This will show status of service as output
sudo systemctl status nginx


This output will make sure it's working fine and got enabled show case that now it will restart the service if it's needed to do so.
Now, you can hit your IP address in browser and verify that you are able to see nginx default page.

Step 4 : Download freely available HTML website files.
You can go on Github and find the project to host like landing page and all. Make sure you clone static site code. Which only have HTML, CSS, JS as other tech might need underlying dependencies. We will cover this things in future.
You can refer this repository for static code if you don't have one : Static Portfolio
Go on the github and clone it in Server. In most of the time Ubuntu has Git by default but if you don't have Git in server you can use this command: sudo apt install git
Then you can clone the code by below command.
git clone https://github.com/Iamrushabhshahh/Static-Site
#You can always use another code
Once cloning done you will see the file in directory.
Step 5 : Move the website files to the Nginx website directory and making Config for Your Website.
Now move your File to /var/www/html
mv filename /var/www/html
Once you done this go to /etc/nginx/sites-available
#This is the location where we tell nginx where to find the Code file
cd etc/nginx/sites-available/
Once you change to this directory create the file with the example.conf . Suppose you have abc.com then create abc.conf
I have iamrushabhshahh.tech as a domain, so I'm creating iamrushabhshahh.conf by entering vi iamrushabhshahh.conf
After this, press I and go in insert mode and paste below content by pressing ctrl + shift + v
#This is the server block which help nginx to find files on base of Domain
server {
    listen 80 default_server;
    listen [::]:80 default_server;
    server_name example.com www.example.com; # Change this to your domain name or IP address

    root /var/www/html/YourFileName; #If you have differnt name of code file change it accordingly and remove Static-Site
    index index.html index.htm;

    location / {
        try_files $uri $uri/ =404;
    }
}
Once you done with this verify with the cat filename and cross check your content of that file.
Once you make sure enter this command it will create symlink in Linux from sites-available to sites-enabled.
sudo ln -s /etc/nginx/sites-available/static-site /etc/nginx/sites-enabled/
Check the Nginx configuration for syntax errors.
sudo nginx -t
If it get succeed you can see this kinda output.

If there are no errors, reload Nginx to apply the changes you made.
sudo systemctl reload nginx
You must delete symlink for default.conf in /etc/nginx/sites-enabled, so when you hit IP you no longer get default page in browser.
sudo rm /etc/nginx/sites-enabled/default
Validate the website using the server IP address.
Let's Now Set Up Domain and SSL,
Step 6 : In your DNS account, create an A record and add the IP
Now, once you are getting content you can bind DNS with IP. For this go in DNS management setting provided by domain provider's side. You can also use third party services for managing DNS.
Now, wherever you're managing you have to add A record in DNS. Let's understand few basic things of DNS settings:
A RECORD : An A record maps a domain name to an IPv4 address.
AAAA RECORD : An AAAA record maps a domain name to an IPv6 address.
CNAME RECORD : A CNAME record is used to create an alias for a domain name. It points one domain name to another domain name. For example, a CNAME record for www.example.com might point to example.com
This is my DNS provider's management console. You might have different console.

Add appropriate things in A record where you mostly add these three things.
Host Name = @
Destination Ip or Host Ip = xx.xx.xx.xx
TTL = 7200

NOTE : The TTL determines how long DNS resolvers should cache the DNS records before querying the DNS server again. A lower TTL means that changes to your DNS records will propagate faster, but it can also increase the load on your DNS server.
Once you add the record give it a while so server can update the details you added.
Step 7 : Use the dig command to verify the DNS records.
There are various ways to make sure that our DNS record change propogated correctly. We can use online tools or CLI commands.
Here's the list of Online tools available on internet.
We can use the below given cli commands for the same.
1 ) nslookup command
nslookup iamrushabhshahh.tech
You will be able to see your server's IP in command's output.

2) dig command
dig A iamrushabhshahh.tech
You can find the output of your server IP in answer section of command's output.

Once you are able to verify DNS and resolve IP, then on entering Domain in the browser you will see your website.
Now, you can see it's working on HTTP and not on HTTPS, so for this we have to setup SSL, for browser to securely communicate with the server. For this we are going to use Let's Encrypt.
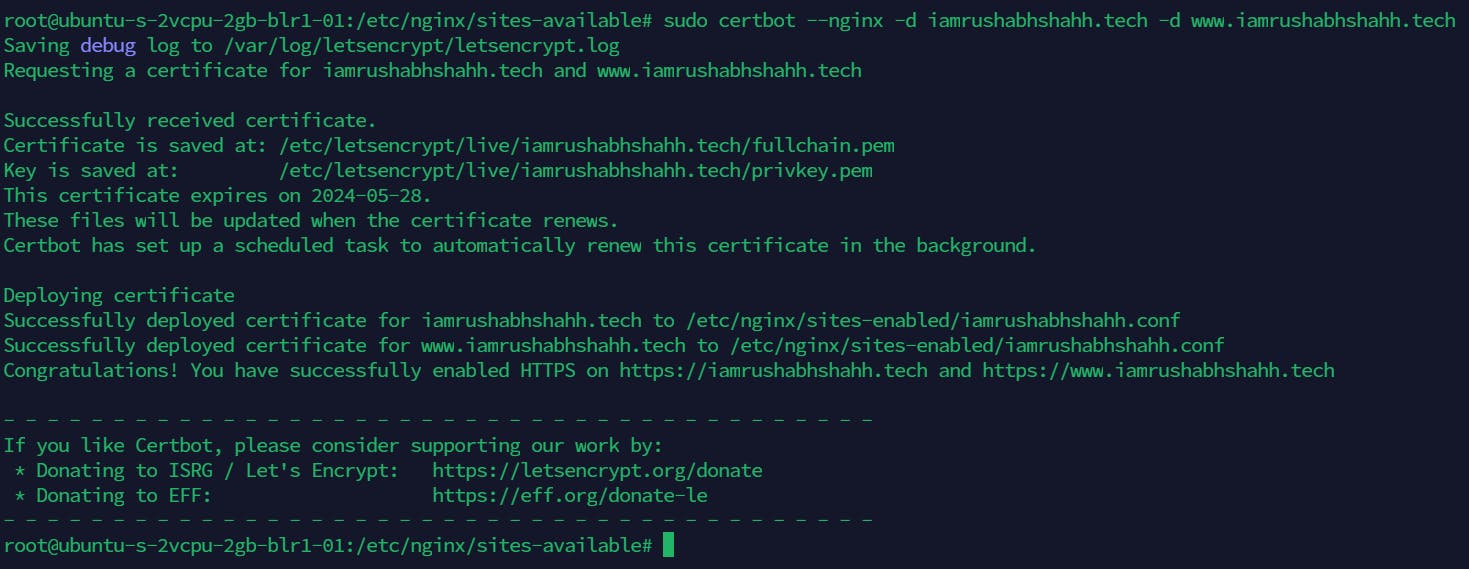
Step 8 : Create a Let's Encrypt certificate for the DNS and configure it on the Nginx server.
Install Certbot and it’s Nginx plugin with apt
sudo apt install certbot python3-certbot-nginx
Now, you have installed Certbot where you can go and proceed further.
Confirming Nginx’s configuration
Certbot needs to be able to find the correct server block in your Nginx configuration for it to be able to automatically configure SSL. Specifically, it does this by looking for a server_name directive that matches the domain you request a certificate.
If you followed the server block in the Nginx config, you should have a server block for your domain at /etc/nginx/sites-available/demo.conf with the server_name directive already set appropriately.
To check, open the configuration file for your domain using nano or your favorite text editor:
sudo nano /etc/nginx/sites-available/example.com
Find the existing server_name line. It should look like this: /etc/nginx/sites-available/yourfilename.conf
...
server_name example.com www.example.com;
...
If it does, exit your editor and move on to the next step.
If it doesn’t, update it and match it with above given server block. Then save the file, quit your editor, and verify the syntax of your configuration edits:
sudo nginx -t
If you get an error, reopen the server block file and check for any typos or missing characters. Once your configuration file’s syntax is correct, reload Nginx to load the new configuration:
sudo systemctl reload nginx
Certbot can now find the correct server block and update it automatically.
Next, let’s update the firewall to allow HTTPS traffic.
Allowing HTTPS through the Firewall
If you have the ufw firewall enabled, and if you haven't allowed the HTTPS, you’ll need to adjust the settings to allow for HTTPS traffic. Luckily, Nginx registers a few profiles with ufw upon installation.
You can see the current setting by typing below command.
sudo ufw status
If it shows inactive to enable ufw firewall enter below command.
sudo ufw enable
Then check status again, you will see output with active status.

To additionally let in HTTPS traffic, allow the Nginx full profile and delete the redundant Nginx HTTP profile allowance:
sudo ufw allow 'Nginx Full'
You can verify by Status using sudo ufw status

Next, let’s run Let's Encrypt certbot and create our certificates.
Step 9 : Let's Encrypt certificate for the DNS and configure it on the Nginx server.
Certbot provides a variety of ways to obtain SSL certificates through plugins. The Nginx plugin will take care of reconfiguring Nginx and reloading the config whenever necessary. To use this plugin, type the following command:
#For example.com and www.example.com you can add your domain
sudo certbot --nginx -d example.com -d www.example.com
This runs certbot with the --nginx plugin, using -d to specify the domain names we’d like the certificate to be valid.
If this is your first time running certbot, you will be prompted to enter an email address and agree to the terms of service. After doing so, certbot will communicate with the Let’s Encrypt server, then run a challenge to verify that you control the domain you’re requesting a certificate for.
If that’s successful, certbot will ask how you’d like to configure your HTTPS settings
Your certificates are downloaded, installed, and loaded. Try reloading your website using https:// and notice your browser’s security indicator. It should indicate that the site is properly secured, usually with a lock icon. If you test your server using the SSL Labs Server Test, it will get an A grade.

You can also able to check the Certificate Value.

Validate the website SSL using the OpenSSL utility.
You can also verify the SSL using OpenSSL Utility in Linux CLI.
openssl s_client -connect yourwebsite.com:443
You'll see this kind of output

To save the output in text file we can use redirect rule.
openssl s_client -connect yourwebsite.com:443 > sslcheck.txt
Now, you've successfully Deployed Static Website with the SSL on it.
If you like this article share it, comment it and follow for more such content on social media.
Till then Happy Clouding...